Pirate Build-A-Pumpkin kit modification over at Living with Lindsay.
Wanna know how? Yeah, of course you do. :)
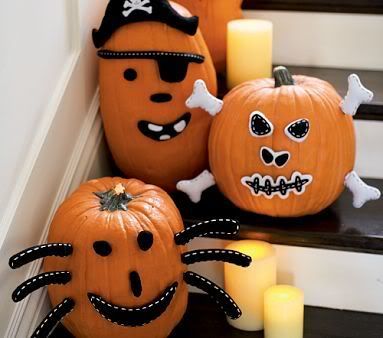
Pottery Barn Inspired Pumpkin Accessories
1. I began by drawing out each of the pieces I wanted to add to each pumpkin.

Don't fancy yourself an artist? No worries. I did the hard work for you and drew out everything you need for the four pumpkins. Click here to download the .pdf file of the artwork. The artwork is scaled for a medium sized pumpkin, so you will need to enlarge or reduce if you are using a large or small pumpkin.
2. Print out the .pdf and cut out the shapes for the pumpkin(s) you want to put together. For this tutorial, I am showing the Skull accessory kit.

3. At your local craft store, pick up some sheets of sticky-backed felt (about $1 each). You will need white and black for each set. I put all four sets together and only ended up using one sheet of white and two sheets of black.

I advise against using the 'soft' sticky-backed felt. It's a pain to peel the backing off of it.
4. Trace and cut out the shapes on each piece of felt. On the artwork, I labeled each piece with the color and the number of each shape you will need to cut out. Some are labeled front and back, which means you need to trace the front side (the side with the writing on it) and the back side (without the writing), so you'll have mirror images of each piece.
Note: On the Cat set, you actually need to cut out 4 front and 4 back of the white rectangles, not 2 of each as noted on the artwork.
5. On the pieces that stick out of the pumpkin, I inserted a toothpick in between the front and back shapes to make a little toothpick sandwich. I just left a small portion of the toothpick sticking out to stick into the pumpkin. I had to break a few of the toothpicks in half so that they wouldn't be too long. Once your little sandwich is put together, you will probably need to trim the edges so that the pieces match up nicely.

The pieces you will need to set up with a toothpick are:
6. After assembling the rest of the pieces that layer on top of each other, draw in the faux stitching. On the white pieces, I used a thin black marker. On the black pieces, I used a silver metallic marker I found at the craft store for a few dollars.

Note: On the Cat set, you actually need to cut out 4 front and 4 back of the white rectangles, not 2 of each as noted on the artwork.
5. On the pieces that stick out of the pumpkin, I inserted a toothpick in between the front and back shapes to make a little toothpick sandwich. I just left a small portion of the toothpick sticking out to stick into the pumpkin. I had to break a few of the toothpicks in half so that they wouldn't be too long. Once your little sandwich is put together, you will probably need to trim the edges so that the pieces match up nicely.
The pieces you will need to set up with a toothpick are:
- Pirate - Hat (I put one toothpick in the center and one on each side)
- Cat - Ears, whiskers
- Skull - Bones
- Spider - Legs
6. After assembling the rest of the pieces that layer on top of each other, draw in the faux stitching. On the white pieces, I used a thin black marker. On the black pieces, I used a silver metallic marker I found at the craft store for a few dollars.
Sorry that picture is so oddly lit. I'm not sure what's going on there.
7. Now, all you have left to do is to peel the backing off of the pieces and stick them directly to your fresh pumpkin or craft pumpkin. The pieces on toothpicks can be easily stuck directly into the pumpkin.
8. Display your new friends proudly!
 I can't believe how much my knock-offs look like the 'real' ones!
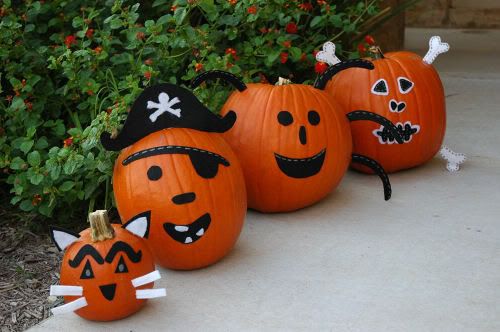
You can create your own Pottery Barn-inspired pumpkin kits for under $5 for all four of them. The only difference between these knock-offs and the real thing is some polyester stuffing in some of the pieces and actual stitching instead of faux stitching. Oh, and $43.
7. Now, all you have left to do is to peel the backing off of the pieces and stick them directly to your fresh pumpkin or craft pumpkin. The pieces on toothpicks can be easily stuck directly into the pumpkin.
8. Display your new friends proudly!
 I can't believe how much my knock-offs look like the 'real' ones!
You can create your own Pottery Barn-inspired pumpkin kits for under $5 for all four of them. The only difference between these knock-offs and the real thing is some polyester stuffing in some of the pieces and actual stitching instead of faux stitching. Oh, and $43.


No comments:
Post a Comment